Nearly three billion people use Facebook every month, and it remains the world’s most popular social platform.
Think about that number. That's over a third of the world’s population.
Regardless of what you sell, it’s very likely that your customers are on Facebook.
So how do you get your business in front of them?
An organic approach will only give you very limited results.
To gain any real visibility on Facebook, you need to pay for it, via a cost effective ad campaign.
But where do you start?
This post shows you exactly how to create sponsored ads on Facebook so you can hit the ground running.
First of all, you need a Meta Business Manager Account…
How to Set Up a Meta Business Manager Account
You’ve likely seen buttons like the following appear on your Facebook Page, inviting you to create ads on Facebook:
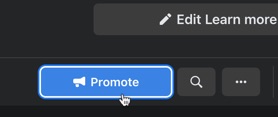
However, while this makes it easy to create ads on Facebook, you don’t get much control and it’s more difficult to create a cost effective campaign.
For that reason, it’s recommended to instead always create ads via an ad account within Meta’s Business Manager (also called the Business Suite), which gives you more control over your ads as well as the ability to advertise over on Instagram too.
Always create Facebook ads via an ad account within Business Manager. You get more control, and it's easier to create a winning sponsored ad campaign.Click To Post OnSo, first things first, if you don’t yet have access to Business Manager, here’s how to set it up:
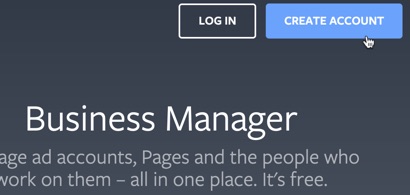
- Go to business.facebook.com/overview
- Click on Create Account - you’ll be asked to then log into Facebook if you’re not already.
- Enter a name for your business, along with your name and the email address you want to use. Click Next.
- Enter your business details and click Submit.
How to Add an Ad Account to Business Manager
You’ll then need to add an ad account to Business Manager to be able to start running ads.
To do so:
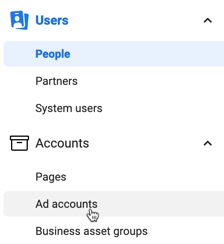
- Go to Business Settings Click Accounts and then Ad accounts from the left-hand navigation.
Click the Add button, and you’ll see three different ways to add an ad account. If you choose the first or second option, you’ll need the ad account ID - here’s how to find it.
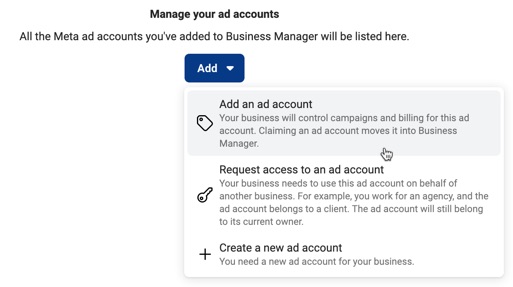
Follow the prompts provided to complete the set up.
With those initial bits all set up, you can now start to create sponsored ads.
How to Create Sponsored Ads on Facebook
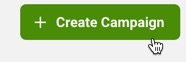
1. Click to Create a Campaign
From within the ads manager, click the button to create a new ad campaign.
2. Choose a Campaign Objective
Facebook has a number of objectives to choose from, within the Awareness, Consideration and Conversion categories as shown below.
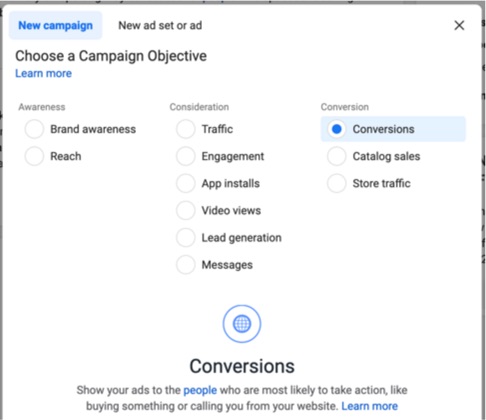
The objective you choose may change what’s required in terms of setting up your sponsored ads.
For this tutorial, we’re going to run with the Conversions objective, which is a little more complicated to set up, but is designed to give you measurable and effective results based on visitors actually converting on your website.
For this to work, you need to have the Meta Pixel (commonly still referred to as the Facebook Pixel) installed on your website, which is how Meta records a conversion, allowing it to build a picture of the type of person most likely to convert.
From there, Meta optimizes your campaign by showing your ads to similar people, helping to increase the likelihood of conversions and lowering ad costs.
Trying to get reach on Facebook organically? It's going to be a lot of hard work with extremely limited results. To win, master Facebook ads.Click To Post On3. Name Your Campaign
Further down the popup, click to name your campaign, along with the ad set and ad that you'll be creating shortly, and click Continue.
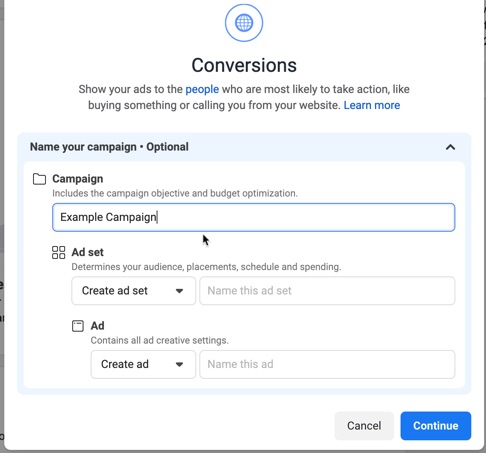
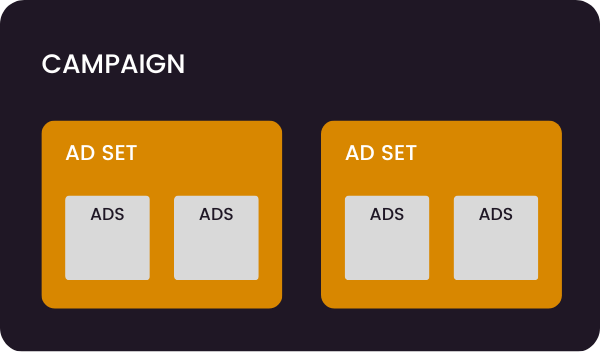
Note that, in common with other ad platforms like Google, campaigns are structured as follows, with one or more ad sets within each campaign, and one or more ads within each ad set.
4. Adjust Campaign Settings
There are multiple settings within the campaign you can adjust if you want to, but for the purposes of this tutorial, you can just leave those for now and click the Next button to skip straight into setting up the ad set as follows.
5. Set Up Your Ad Set
The ad set is where you establish:
- Who you're targeting—in other words, who you want to see your ads (how to do this is summarized below, but here's a full guide on how to use Facebook's detailed targeting options)
- Delivery settings—so where and when your ads are going to run
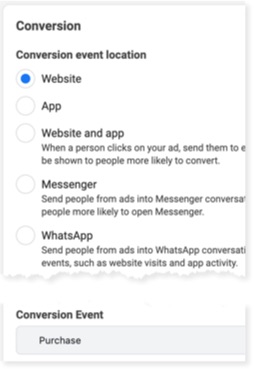
Conversion
Under Conversion, we'll assume you'll be sending people to your website, so we'll leave the default Website option selected.
And let’s imagine you have an ecommerce store and you’re interested in people making a purchase, so select Purchase as your Conversion Event.
Budget
Under budget, leave it set to a Daily Budget rather than the Lifetime Budget option.
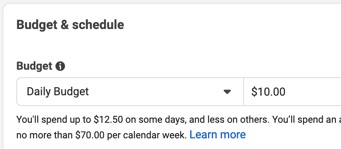
This means your campaign will be running consistently, it tends to produce better results, and it’s easier to scale, such as by gradually increasing the daily budget over time.
In terms of the budgeted amount, it needs to be:
- Enough so that you get enough data coming through to make it in some way meaningful (usually $10 to $20 a day to start with is fine)
- Not so much that would make it painful to lose—after all, the initial part of any campaign is simply about getting enough data through to be able to optimize it, it won’t necessarily immediately generate a profit
Audience
You’ll see the ability to create a custom audience or select an existing one. As you’re just getting started, leave this for now.
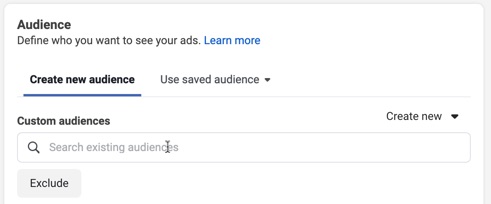
Once you’re more used to running Facebook ads, you can look into taking advantage of this type of more advanced functionality.
Moving onto Locations, set this to reflect where the majority of your potential customers are from.
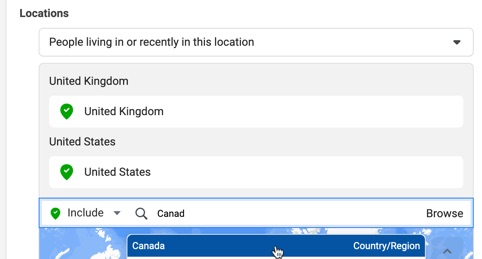
So if you sell internationally, that could be multiple countries, or a single country if you sell something nationally.
Or for local businesses, you can simply select your local area.
In the Age section, set this to reflect the general age range of the majority of your customers. But don’t be too restrictive, so set it a little wider than what you believe the age range of your customers to be.
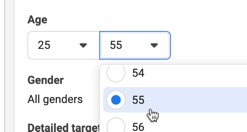
For Gender, you can generally leave this set to All genders. You only really need to adjust it if your customers tend to be overwhelmingly either male or female, so at least 80-90% of them.
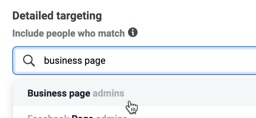
Facebook's now pay to play. To gain visibility on Facebook, you need to be able to pay for it via a cost effective ad campaign.Click To Post OnThe Detailed targeting section is where you can target your prospective customers based on their demographics, interests or behaviors. To start with, just pick one option per ad set so that you can test how the targeting performs, and let Meta’s AI do the rest.
For example, if you’re targeting business owners, then selecting Business page admins is a good first option.
Check the Audience definition to see the size of your prospective audience. Generally speaking, you’re looking for a fairly broad selection so that Meta’s AI has enough people to show your ads to and work out who is going to respond best.
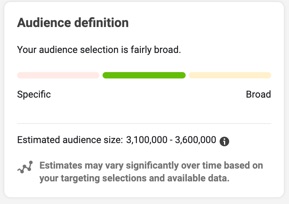
Unless you’re a local business which by definition has a restricted number of people to potentially advertise to, your estimated audience size should be at least 250,000 to 300,000 people.
Otherwise, your targeting is likely to be too narrow, so look to adjust some of your targeting options in order to broaden it out.
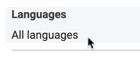
You can generally leave the Languages option alone, unless for example you are specifically targeting a language in a location where it’s not the majority language, such as English speakers in continental European countries, French speakers in Canada, and so on.
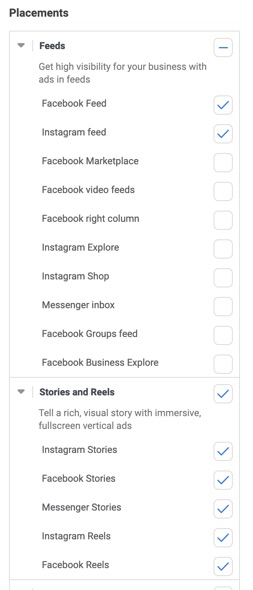
Placements
If you’re using the Conversions objective as suggested above, you can use the Advantage+ placements option, as Meta will use its AI to determine where you’re likely to get the most conversions from and deliver the best results.
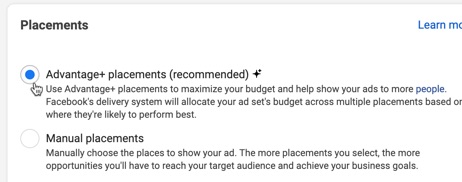
But if you’re using say the Traffic objective instead for your campaign, then use the manual option and uncheck anything other than the Feeds and Stories and Reels options.
This helps keep the quality of the traffic you get as high as possible, as you’re not using the Meta Pixel to help Meta adjust the traffic it sends automatically.
You can even narrow it down further if you want to, such as restricting the Feeds options to just Facebook News Feed and Instagram Feed.
Optimization & delivery
Just leave these options for now. This section might be something you want to revisit later as you get used to running your sponsored ads.
Click Next to start setting up your ads.
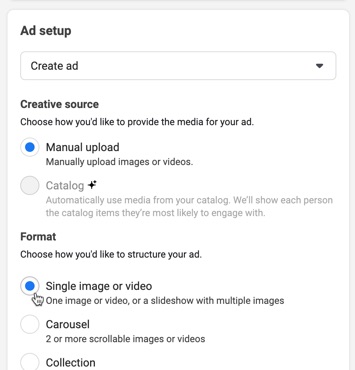
6. Set Up Your Ads
The ad itself is of course what your targeted audience will actually see, and will determine whether or not they take action on it.
Just go with something really simple to start with like a single image ad, or a video ad if you have one available and ready to use.
Click to add an image.
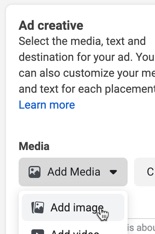
Either select an image already in your account, or upload one and then select it.
For the different placements, you can select a replacement of the image to better fit the relevant size. But if you don’t have an alternative available, it will be fine to run as it is to start with, and Meta will adjust it to blend in with the space available.
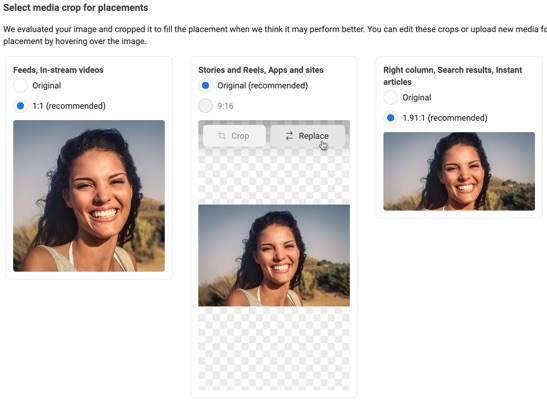
Otherwise, go with the recommended options, and click Next.
On the Optimize section, check the Allow enhancements checkbox, allowing Meta to adjust the brightness, contrast and aspect ratio of your image when it’s likely to improve the performance of your ads.

Click Done, and you’ll see previews of your ad across different placements appear on the right.
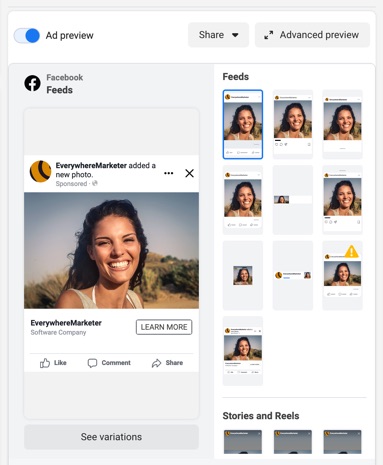
Now set up the text elements of your ad as follows—use the preview to see how this affects your ad:
- Primary text: this is what shows as the main post text, e.g. in the feed on Facebook. A good format to use is to transition from emotion to get people interested, into logic so they understand why they should act, and then into a call to action, telling them exactly what to do. Adding emojis often helps increase engagement.
- Headline: this is optional but generally recommended, and will show beneath the image of your ad.
- Description: again this is optional, showing beneath the headline under the image.
- Call to Action: select an appropriate call to action, such as Learn More, Shop Now, Subscribe and so on.
Under Destination, add the URL that you want to send people to, optionally entering a different URL further down as the display link.
There are a few other more advanced bits here, but just ignore these for now so you can just get started. However, they’re worth exploring and finding out more about as you progress.
Then create one or more additional ads that are different in one way or another so you can see how they each perform, see what your market best responds to, and adjust accordingly.
If you're getting started with Facebook's sponsored ads, don't expect to get instant success. Success comes from optimizing your ads over time via incremental improvements.Click To Post On7. Optimize to Success
Now for some harsh truth.
It’s unlikely your sponsored ads will work successfully straight away, so any expectation they will be immediately profitable is unfortunately unrealistic.
Of course, it can happen. But it’s unlikely.
Your expectation should be that your initial expenditure on your Facebook ads is simply to start getting some data in so you can see what works and what doesn’t.
As you get data, you can then adjust your campaigns and your ads accordingly, improve and optimize them over time, and make them successful.
It’s important to have this more realistic expectation, because otherwise it’s easy to see some disappointing initial data and decide to simply halt the expenditure and give up entirely.
Instead, the early part of your campaign is about investing in your future success, teaching you about your market, and what works and what doesn’t, so you can then create increasingly effective ads that at some point start delivering healthy, profitable returns for you.
Frequently Asked Questions
How can I set up a Meta Business Manager Account?
Go to business.facebook.com/overview, create an account, enter business details, and submit.
How do I add an ad account to Business Manager?
Navigate to Business Settings, click on Accounts, then Ad accounts, and follow the prompts to add an ad account.
What are the steps to create sponsored ads on Facebook?
Click to create a campaign, choose an objective, name your campaign, adjust settings, set up the ad set, and create your ads.
To Conclude
This post has shown you exactly how to create sponsored ads on Facebook, guiding you through the entire process, from setting up a Meta Business Manager account if you don’t yet have one, to setting up your ads and running them successfully.
Just remember that your ads will begin to tire after a certain amount of time, so keep a close eye on the data and periodically introduce new creatives.